Soooo, Tutorial Monday didn’t really work out like I had originally planned due to being crazy busy most of the time, so I am just going to try to get them in whenever I can!
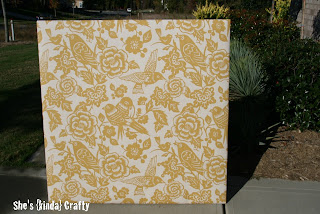
I kick myself for not taking a picture before I took it down but I use to have a 4×4 cork tile bulletin board in my office. We created it by attaching 16 cork tiles to the wall (4 rows of 4) and then as cards, photos, and announcements came in, I just pinned them to the wall. R’s artwork, important documents, you name it, they all got pinned to the cork tiles that were hanging over my desk. Well, we rearranged the office so that my husband could have a desk, too and the bulletin board was just out of place so I ripped it down. Because I had used mounting tape to attach the tiles it was pretty ugly underneath, so I needed a new solution, a prettier solution. I searched the entire Internet for a fabric I liked that wouldn’t clash with the curtains and took a drive over to the interior decor fabric store (holy fabrics batman, there are thousands and thousands of fabrics to go through! I don’t know how interior decorators do it) and finally went to my local Calico Corners because they were have a great sale. And there, I found it, the fabric I HAD to have. Problem was, it was on back order and then the back order date came and went and I got a call it wouldn’t be available until late November, ugh! However, when we were on vacation I came home to a great surprise, my fabric had arrived!! Isn’t it lovely??? I really love it and it was worth the wait!
So there is the back story to my new bulletin board and here is the tutorial on how you can make your own!
(You don’t have to make yours 4×4, but it does make a statement)
Materials Needed:
-
4×4 piece of thin plywood (I know it has a technical name, but I don’t know what that is, but it’s the thinnest sheet of plywood at the home supply store). It comes in 4×8 sheets but the nice people at Lowe’s or Home Depot will cut it down to whatever size you want.
-
16 feet (2 pieces) of 1×2 wood
-
2 rolls of cork (I purchased mine at Office Max)
-
thin layer of batting (you could probably do without this if you don’t want a smooth pillowy look)
-
2 yards of home decor fabric (the 54″ wide variety)
-
staple gun w/ staples & brads
-
wood glue
1) Measure 2 opposite sides of your plywood (should be pretty close to 48 inches) and cut your 1×2 to size. Apply a thin line of wood glue to the plywood and lay your 1×2 down on top, flush with the edge of the plywood (you want to lay the 2 inch side down flat on the plywood). Repeat on the opposite side of plywood. Clamp down the plywood and 1x2s so that you can flip them over and attach the 1×2’s with brads in your staple gun. If you don’t have a staple gun that accepts brads you can use a hammer and nails to attach them.
2) Now measure the length between the 2-1×2’s you’ve just glued down to get the measurement you need for the final 2 pieces of 1×2 that you need to cut. Once you have cut them to size follow the same steps as above. You can add a couple staples at the seams of your 1×2’s to extra security.
Now you have your base with a frame on the back for easy hanging.
3) Unroll your cork and arrange it on the front of the plywood. We used spray adhesive to attach it to the plywood but that really doesn’t work well. You are better off stapling it, but you can wait until the next step to staple it if you are going to use batting. (if you aren’t using batting go ahead and staple it now)
4) Arrange your batting so that nothing is overlapping and it doesn’t fall over the edge. Then get out your staple gun and go to town! Staple it all around the edges and then several times in the middle to make sure nothing shifts.
5) You want your fabric to have 3-4″ of extra length and width on all 4 sides. I laid down my fabric on top of the cork and batting and cut it right then and there instead of pre-cutting it so I knew I had enough on all sides. Once you have cut your fabric and it is placed right side up on the ply wood flip the whole thing over (make sure your work surface is clean!!)
6) Starting with whichever side you want, start in the middle of the board and staple down the fabric every 2-4 inches.
7) On the opposite side of where you just stapled, starting in the middle again, pull the fabric taut and staple every 2-4 inches again, constantly pulling the fabric tight while you staple.
8) Now pick one of the 2 sides you have remaining and repeat the stapling process stopping when you are about 6 inches to the each of the corners (remember to pull everything taut while you are stapling – I easily picked up the board a half dozen times to check on it).
9) Oh, the corners! This is the only tricky part of the entire project. You need to cut away some of the excess material at the corners. I like to wrap my corners by pulling up the bottom fabric straight up and holding it tight making a 90 degree angle with the board, tucking in any extra fabric that pops out. Then lay that fabric down, holding it really tight, and staple it. (I should have taken a picture of this step but I was too “in the zone” to stop). Take your time and play with it until you get it the way you want and try to remember how you did, b/c you are going to have to repeat it! Repeat the corner wrapping on the other corner. Now you have 3 complete sides.
10) Repeat steps 8&9 and TA-DA!!! You are finished.
To hang the bulletin board (or it could just be a piece of art work) you want to find 2 studs and drill in 2 longish screws leaving about 1/2″ out of the wall and just rest the frame of your board on those nails.
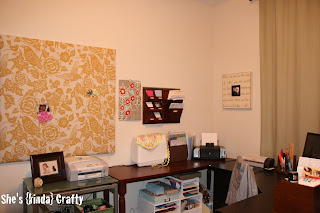
Now I just need to find the perfect push pins to compliment the fabric & clean my office up enough to be able to take a picture of it hanging up for you 🙂
UPDATE: So I cleaned up my office a little bit, but it is a {HOT MESS} don’t judge 🙂
UPDATE: So I cleaned up my office a little bit, but it is a {HOT MESS} don’t judge 🙂
 |
| This is not nearly enough storage, I need a craftervention |
Linking up here:


i LOVE that fabric! well worth the wait! 🙂
stopping by from polkadot giraffe
Dear Stacy, your bulletin board looks great! The fabric is AVIARY in color Maize from Calico Corners – Calico Home and it’s online at http://www.calicocorners.com. Aviary comes in 5 colors–all wonderful. It was designed by ThomasPaul who is quite well known for his graphic style.
One suggestion: instead of resting your bulletin board on screws, you could attach two pieces of hardware to the back of the bulletin board, an inch or so down from the top. The hardware I’m trying to describe has a semi-circular metal element attached to a screw (picture framers often use them to hold a wire on the back of a frame). Then align two molly bolts or similar on your wall where the hooks will hold the board to the wall. I think this will provide more support and be more secure. Happy decorating!
Jan Jessup
I want to make one of these. Thank for the tut!
Thanks for linking up to TOO Cute Tuesday!
http://funkypolkadotgiraffe.blogspot.com/
i came over from 30 handmade days…this board is adorable. love the fabric too.
Nice board, nice tutorial, can I have the rest of the room, too? I need a space like this!!!
found you via TT&J. Love the fabric you chose. It turned out adorable. I need one for my craft room too! ♥ DavesWife
It’s so pretty! Great job! I’m a true sucker for any sort of memo or bulletin board.
It’s very pretty and practical. Love your fabric choice!
Hi, I’m linking over from Tatertots & Jello. Love this pretty gold fabric! Great job.
Warmly, Michelle
Stopping by from Tatertots and jello. I have been looking for a large bulletin board for our playroom, but they are pricey! I’ll be trying out this project next weekend, thanks for the tutorial. I have enjoyed reading about your project, and would welcome your thoughts on mine
http://homeismore.blogspot.com/2010/10/vintage-inspired-halloween-party.html
What a great board. You could almost make one that would fill a whole wall. I love how big it is and the cute fabric. You also have a very organized office. I agree, mine will stay clean long enought for a picture then it is filled with crafts again. LOL!
Love that fabric! Great job!
great fabric choice!
love this board! I’ll definitely have to try it! Come visit my blog kilwifey.blogspot.com 🙂